Set up and activate your Japan Wireless eSIM on your iPhone
Set up and activate your Japan Wireless eSIM on your Android

Activate your eSIM on your iPhone as soon as you land in Japan.

Install your eSIM by simply scanning our QR code.

If scanning doesn’t work, manually install your eSIM directly into your iPhone.
Japan Wireless eSIM iPhone set up Guide
Step by step instructions
Select your eSIM installation method for iPhone
Select your eSIM installation method for Android

Important Information
- You can connect to the airport WiFi to install your eSIM.
- Your Japan Wireless eSIM can only be installed once.

Let's begin with your iPhone QR code set up guide!
Let's begin with your Android QR code set up guide!
Open your email/PDF

After purchasing your Japan Wireless eSIM, open the email/PDF that contains your QR coded eSIM on another device or print it out.
Enter the details manually

Open your camera app on your iPhone or navigate to “settings” > “Cellular” > “Add eSIM” to scan your QR coded eSIM.
Proceed through the steps

If you are having difficulties, refer to our step by step iPhone guide below. We are here to help with your Japan Wireless eSIM!
Open your email/PDF
After purchasing your Japan Wireless eSIM, open the email/PDF that contains your QR coded eSIM on another device or print it out.
Scan the QR code
Open your camera app on your iPhone or navigate to “settings” > “Cellular” > “Add eSIM” to scan your QR coded eSIM.
Proceed through the steps
If you are having difficulties, refer to our step by step iPhone guide below. We are here to help with your Japan Wireless eSIM!
Open your email/PDF
After purchasing your Japan Wireless eSIM, open the email/PDF that contains your “SM-DP + Address” code & “Activation code”
Enter the details manually
Open your camera app on your Android or navigate to “settings” > “Network & internet” > “SIMs” > “add SIM” to scan your QR coded eSIM.
Proceed through the steps
If you are having difficulties, refer to our step by step Android guide below. We are here to help with your Japan Wireless eSIM!
Open your email/PDF
After purchasing your Japan Wireless eSIM, open the email/PDF that contains your QR coded eSIM on another device or print it out.
Scan the QR code
Scan the QR code
Proceed through the steps
If you are having difficulties, refer to our step by step Android guide below. We are here to help with your Japan Wireless eSIM!
iPhone activation guide for your eSIM
Android activation guide for your eSIM
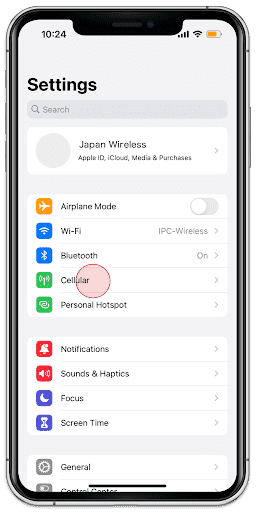 1.Go to [Settings] and tap [Cellular]
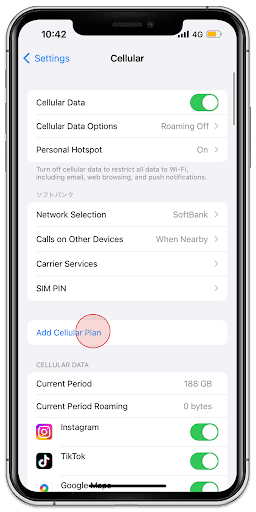 2.Tap [Add Cellular Plan]
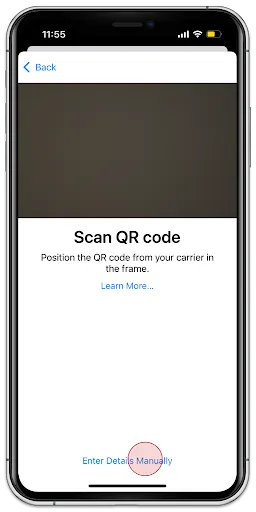 3.Tap [Enter Details Manually]
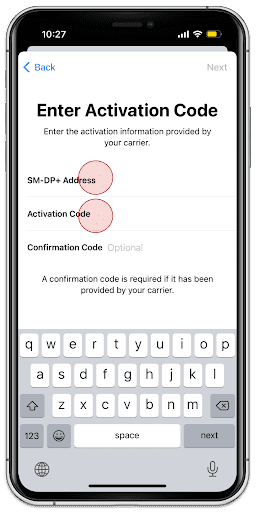 4.[Type SM-DP+ Address] and [Activation Code]
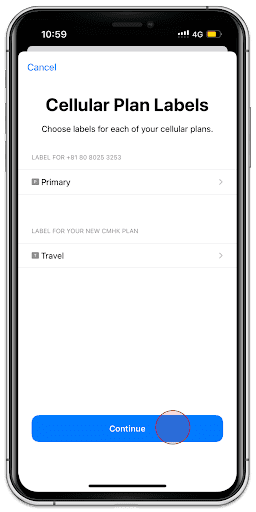 5.Tap [Continue]
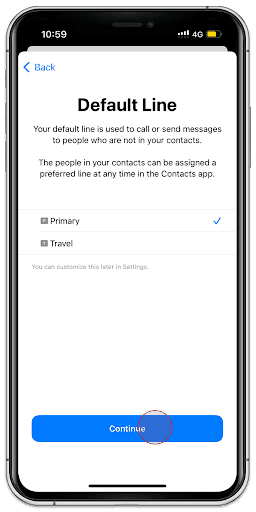 6.[Select Primary] and tap [Continue]
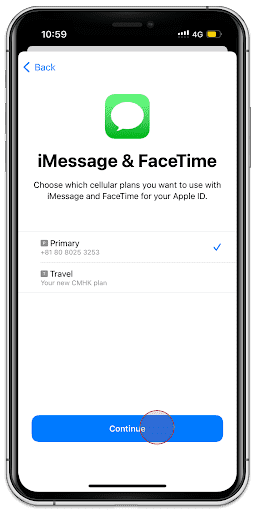 7.Select Second Choice and tap [Continue]
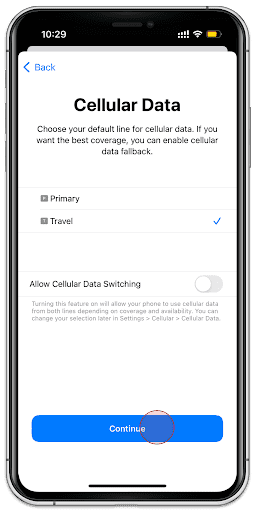 8.Tap the eSIM you added
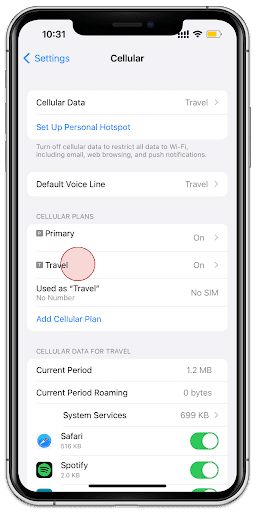 9.Tap the eSIM you added
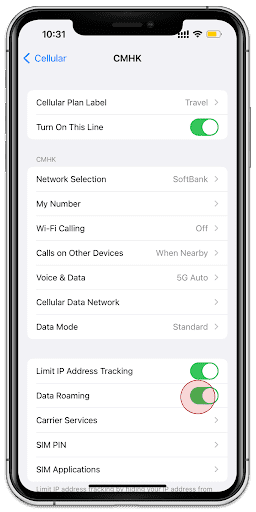 10.Turn on [Data Roaming]
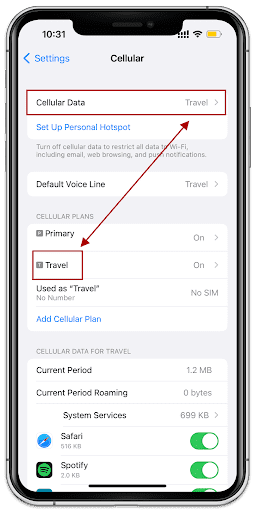 11.Make sure those are corresponding
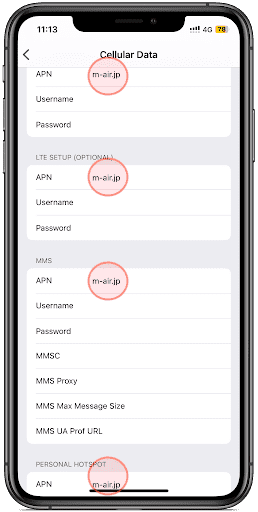 12.Under [Cellular Data Network]
 add the APN: m-air.jp/ jpsim.net as shown above
5G eSIM does not require this step
 That's all for eSIM settings!
eSIM can only be installed once. Please note that if you delete the eSIM from your device after installation, you will not be able to reinstall it.
Download our set up guide for Japan Wireless eSIM

Download our set up guide for Japan Wireless eSIM
- Please be sure to activate your eSIM once you land in Japan.
- You will also receive a downloadable PDF for your eSIM set up guide in the email after purchase!
This completes your iPhone setup guide!
If you have any questions at all during your stay in Japan, please contact our customer service center.
We wish you a happy stay!


Japan nationwide coverage
Stay connected in Japan with our eSIM. You can keep your carrier SIM in place and roam freely with your Dual SIM device.